Field notes.
From inside the work.
What we've learned wiring CX, operations, data, and AI for businesses that would rather fix the leak than buy another tool. No thought leadership. Just what worked.
What self-storage operators are actually getting from Google Ads (and what they're wasting)
Google Ads works for self-storage, and it burns budget fast when it's set-and-forget. What the best-run accounts do differently.
Read the article →
How to Choose Self-Storage Management Software
Match the software to your three biggest operational problems, pressure-test its integrations and API, and check implementation with references who went live in the last year. Fit matters more than brand. A platform that solves your real problems cleanly beats a bigger name that doesn't.
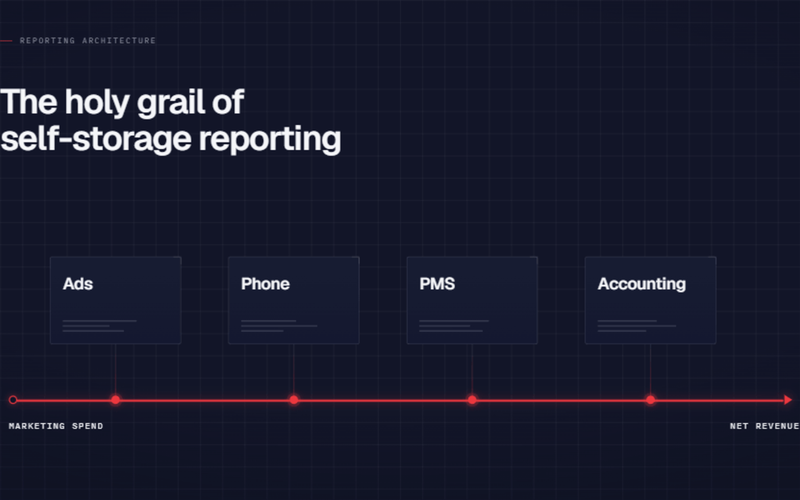
The holy grail of self-storage reporting
Two or three weeks before the month closes, you already know whether you're landing above or below budget. That's what one connected reporting line gets you: marketing spend to leads to move-ins to net revenue, in a single view. Here's the architecture, where it breaks, and where to start. If you want it shorter for tighter placements: Operators have all the pieces, PMS, phone system, ad platform, accounting, but they don't talk, so the line from marketing spend to net revenue never gets drawn. Here's how to draw it.
Most Self-Storage CRM Projects Fail Before the Software Is Chosen
A CRM won't fix a sales process you haven't designed. It just shows you, in higher resolution, that you never designed one.

Using AI Isn't the Same as Integrating It
Ninety percent of European self-storage operators now use AI. But adopting AI isn't the same as integrating it. Four signs your tech stack isn't actually talking to itself.

Self-Storage Customer Operations: Why Ticketing Is the Right Foundation
Why the ticket, not the deal, is the right foundation for self-storage customer operations, plus a 6-question checklist for your next vendor conversation.

Beyond the Padlock: How Astute Access is Digitizing Self-Storage
Astute Access CEO Nick Mooyman on going fully keyless, staying hardware-agnostic, and why containerized self-storage is leading the world.

Run Your Self-Storage Like a Swiss Watch: The Data Discipline Behind Precision Operations
Most self-storage operations don't drift because the data is missing — they drift because the data isn't connected. The data discipline behind operations that run with precision.

AI in Self-Storage, Without the Hype
Most of what's written about AI in self-storage is hype - smart facilities, robot everything, "the future of storage." Meanwhile the wins actually available today are boring.
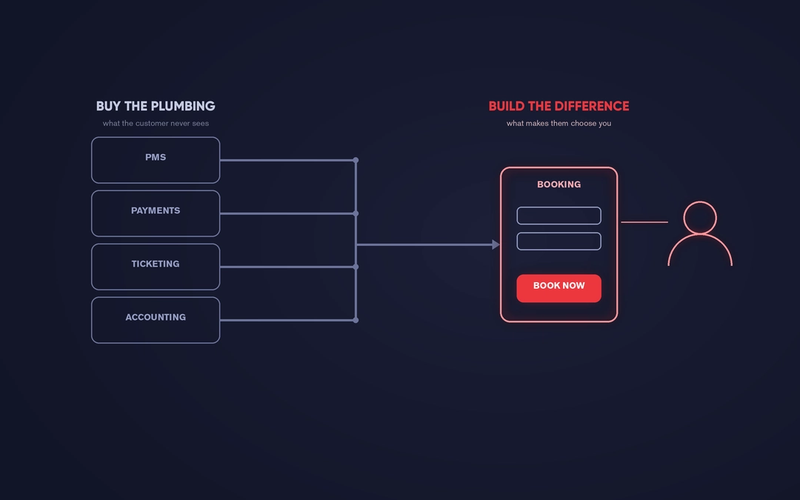
Buy the Plumbing, Build the Difference
"Build or buy?" is the wrong question. The right one: does this make customers choose you, or does it just need to work?
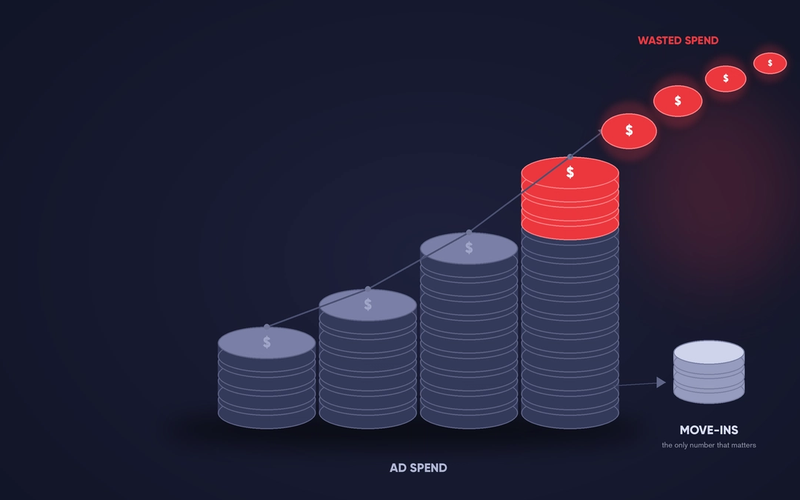
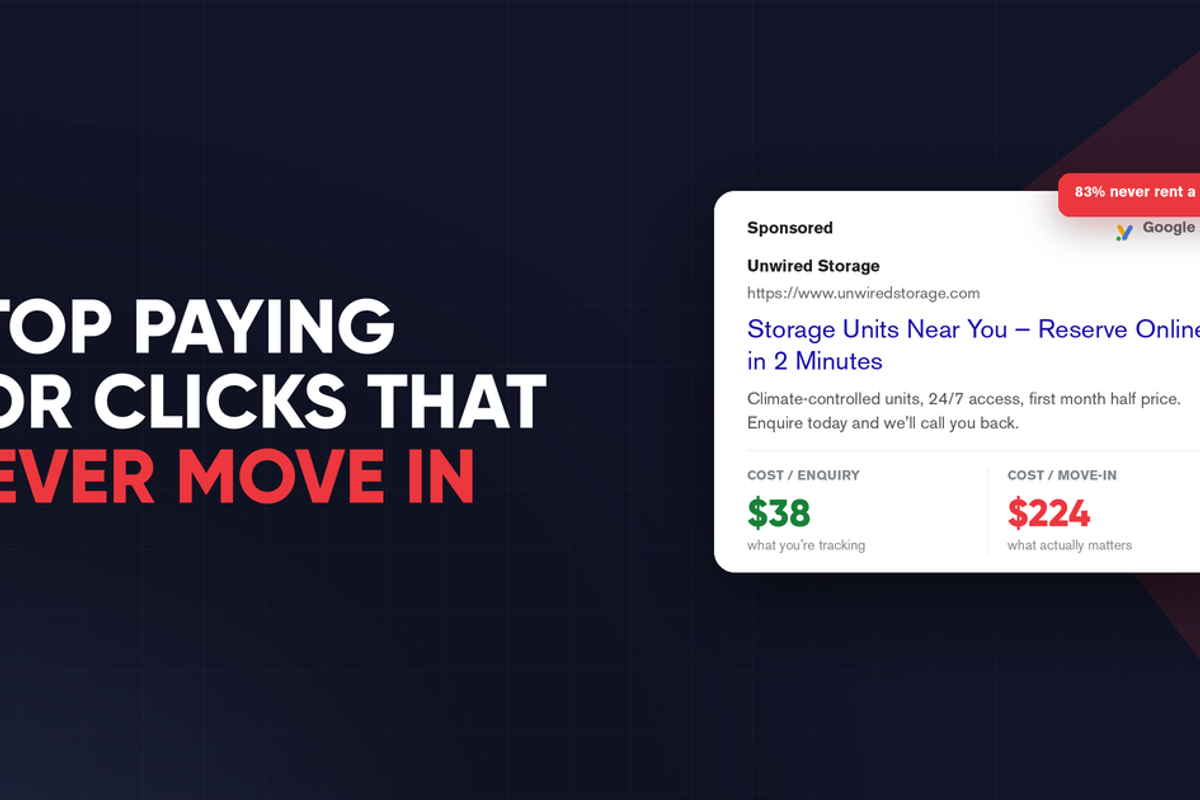
Cost Per Move-In Is the Only Ad Number That Matters
If you're paying for Google or Meta ads, your agency probably reports cost per lead. That number is close to useless, and budgets allocated on it routinely flow to exactly the wrong campaigns.
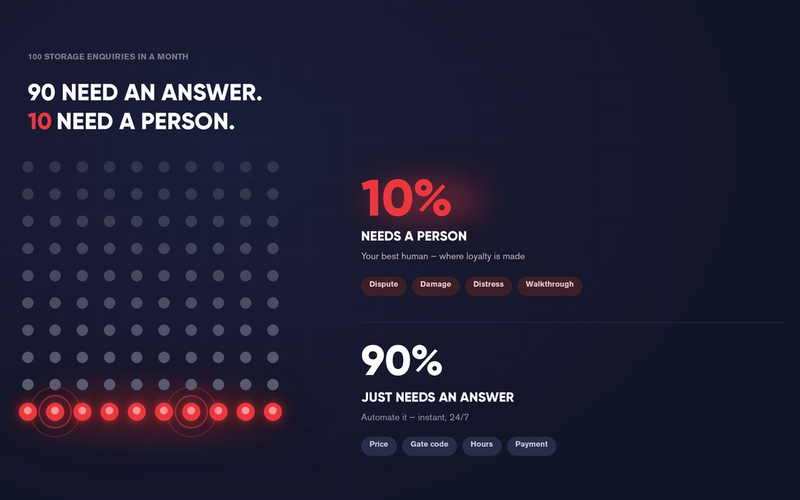
The Human Touch Belongs in the Moments That Matter
Operators tell me their customers want a human connection. They're right - but not about where.
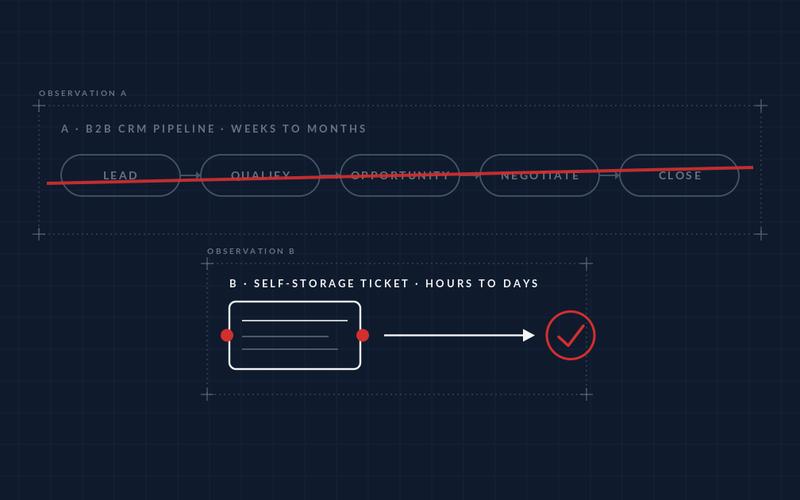
Storage Doesn't Need a CRM. It Needs a Ticketing System.
Most self-storage operators run their sales on a B2B CRM - HubSpot, Pipedrive, Sugar, something in that family. I think that's the wrong tool, and I say so out loud.
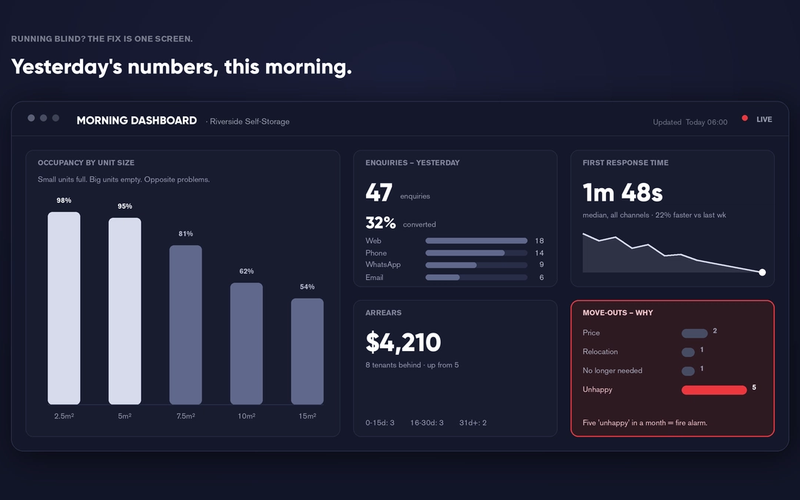
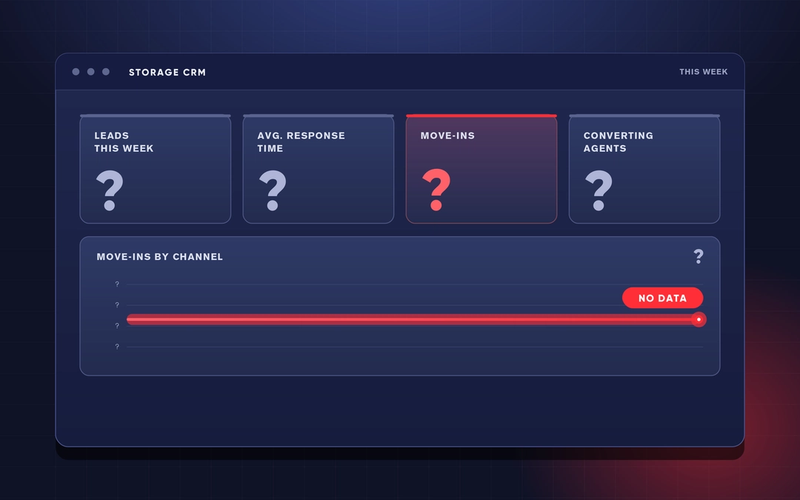
Most Storage Operators Are Running Blind
Ask a storage operator for three numbers - occupancy by unit size, enquiry-to-move-in conversion rate, and average response time - and watch what happens.

Why Your Best Google or Meta Campaign Might Be Your Worst
Clicks and cost-per-lead make a campaign look great, but the tracking loop ends at the "thank you" page, not the signed lease. How broken attribution quietly wastes 25-40% of ad spend, and how closing the loop to your PMS or CRM fixes it.

Self-Storage Customer Operations: Why Ticketing Is the Right Foundation (Part 3)
Previously:

Self-Storage Customer Operations: Why Ticketing Is the Right Foundation (Part 2)
Previously: Part 1 — The wrong foundation.
Self-Storage Customer Operations: Why Ticketing Is the Right Foundation (Part 1)
Most self-storage operators we work with are running their customer-facing operations on a B2B CRM — HubSpot, Pipedrive, and others built for sales teams.

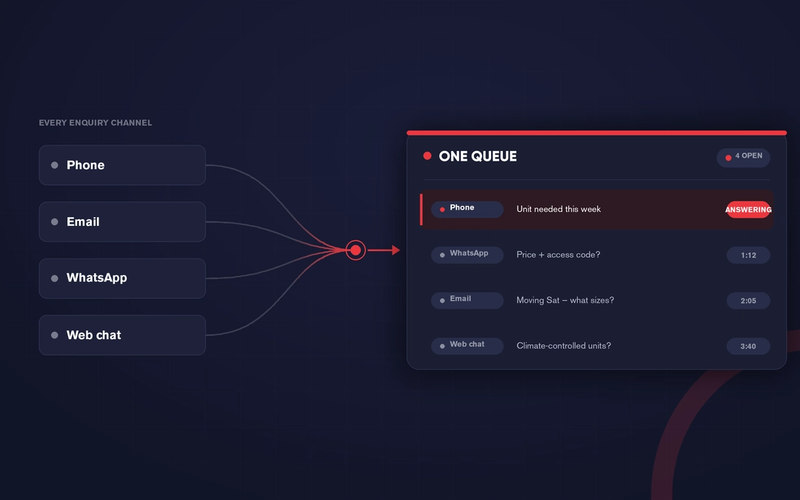
The 24/7 Facility
Your customers want to book at 11pm. Most facilities can't meet them there — and they're losing leads they never knew they had.

Goodbye Google, Hello AI: How Self-Storage Businesses Need to Adapt in 2025
My name is Henry Purchase. I'm from the UK in Birmingham, two hours north of London.

Say Goodbye to Order Inquiries & Other Tasks - AI Takes the Wheel
AI technology is rapidly transforming the self-storage industry, empowering operators to redefine how they run their business.
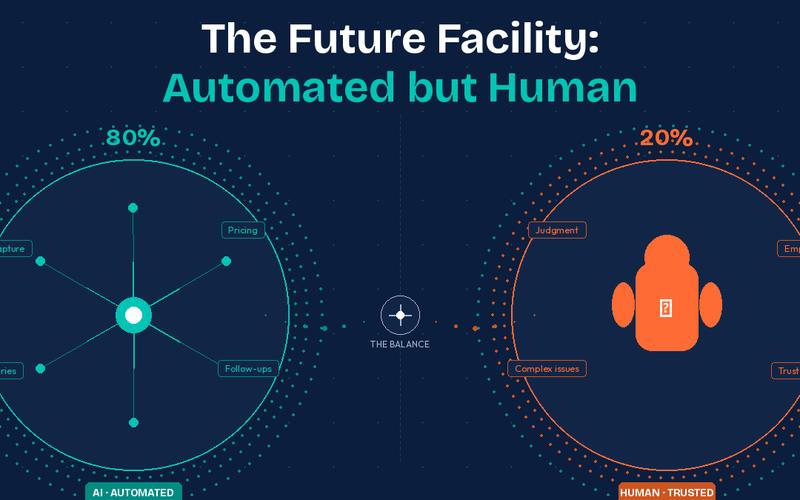
Run by AI. Trusted by Humans
Run by AI. Trusted by humans. Learn how modern self-storage operators are balancing automation with the human touch — and why it's the key to retention…

Customer Experience Is Your New Access Control
Mid-market operators talk a lot about access control.

Are You Truly AI-Ready? Understanding Where Your Organization Stands
Many organizations are eager to adopt AI, but readiness goes far beyond having the latest tools.

Growing Self-Storage with AI – Interview with Tim Slesinger, CEO of easyStorage
CEO easyStorage – Tim has partnered with Sir Stelios and the easyGroup, as his brand partner, to offer a sensibly priced alternative to self-storage.
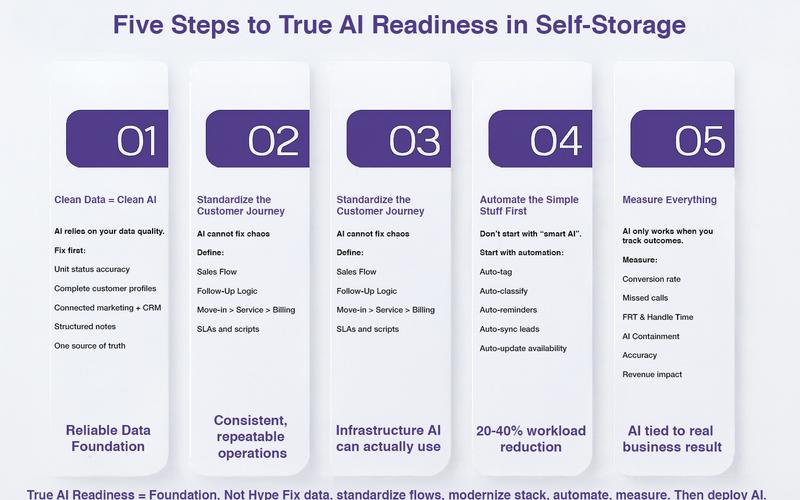
Five Steps to True AI Readiness in Self-Storage
Most operators think they’re ready for AI.

From Contact Management to Conversation Management
The costs for a CRM system can very quickly ramp up. Commonly, the major part of all software expenditures of a self-storage business goes to managing…

AI for Marketing: The Rise of AI Search Engines in Self-Storage
AI Search Engines, such as ChatGPT, Gemini, Claude, and Perplexity, are gradually replacing traditional search engines.
![Can You Store Guns in a Storage Unit [2025 Operators Guide]](https://cdn.sanity.io/images/6yja2t5t/production/88eff6de07291b20e24064f8b9b34aef6df6338e-300x300.png?rect=0,56,300,188&w=800&h=500&fit=crop&auto=format)
The Unwired Exchange: 24/7 Customer Engagement and AI Call Centers - Francesco Decamilli, CEO of Uniti AI speaks about AI in Self-Storage
Welcome to The Unwired Exchange, where we spotlight the trailblazers shaping the future of self-storage.

Why Digital Transformation Matters Now More Than Ever
Digital transformation (DX) is more than just tech adoption—it's about rethinking how businesses operate and deliver value.

Secure Storage Lockers: Upgrade Your Facility’s Security
In an era where security is paramount, upgrading your facility with secure storage lockers is a wise investment.
Can You Store Guns in a Storage Unit? [2025 Operators Guide]
One popular question among storage enthusiasts is: Can you store guns in a storage unit?
How Big of a Storage Unit Do I Need? [Size & Price Guide]
Choosing the right unit size is one of the most tricky decisions when renting a storage space.

How to Find Storage Units Up for Bid: 2025 Operator’s Guide
With the increasing popularity of TV shows like Storage Wars, storage unit auctions are getting more attention.

Is It Legal to Live in a Storage Unit? (2025 Guide)
As a self-storage business owner, you’ve likely encountered certain unusual situations in your facility.

Self-Storage Rent Increase Laws in the US [2025 Guide]
As a self-storage operator in the United States, staying informed about rent increase laws is crucial for your business, as they significantly impact your…
Storage Unit Insurance Coverage: 2025 Guide for Operators
As a self-storage facility operator, protecting your business and customers’ belongings is of the utmost importance, and storage unit insurance helps you…

How to Invest in Storage Units: 2025 Ultimate Guide
Are you looking for a unique investment opportunity with the potential for decent returns? Investing in storage units might be the answer.

How to Write a Winning Self-Storage Business Plan in 2025 (+ Example)
With a $57.76 billion market cap in 2024, the self-storage industry is the new goldmine.
How to Start Self-Storage Business From Scratch: 2025 Update
Are you in search of a lucrative business opportunity with low overhead and steady demand?

How Much Does It Cost to Build Self-Storage Facility in 2025?
Are you considering investing in the lucrative self-storage industry? That’s a great decision!

How to Do Self-Storage Marketing in 2025: The Ultimate Guide
As the self-storage industry becomes increasingly competitive, it’s crucial to stay ahead of the curve with innovative approaches to attracting and…

How Much Can You Make in Annual Income Owning Storage Units?
Have you ever considered investing in storage units as a potential income stream?

8 Pros and Cons of Owning a Storage Facility [2025 Guide]
Are you considering potential business ventures for 2025 and beyond? If so, you likely have a shortlist of options you want to explore further before…

Setting-up and Running Unmanned Self-Storage Facilities
A guide for independent operators looking to automate and streamline their business.
Automated Self-Storage: Blueprint for Work Less, Earn More
The self-storage industry is rapidly transforming, and automation is critical to staying competitive.

Top 3 Time-Saving Solutions for Self-Storage Automation
Even for small operators, or maybe even especially for small operators, having the right technology solution is crucial for continued success.
Self-Storage Technology’s Impact on the Industry: 2024 Guide
In an industry valued at over $56.81 billion globally, self-storage operators are increasingly turning to technology to stay competitive.

Ultimate Guide to Implementing Self-Storage Automation [2024]
According to data from 2022, about 25% of operators currently implement automation at their self-storage facilities, while 58% said they plan to do the…

Automate Self-Storage Billing with Storeganise Solutions
Automation is a powerful tool to improve security and reduce overheads. Free up yourself or your staff by handing over routine tasks such as:

Harnessing AI for Data Analysis: Insights from Shahtaj
My name is Shahtaj. I'm working with HBL as a data analyst in the financial inclusion and innovation department.

Enhance Your Business with AI-Powered Customer Support
Do you want to keep talking with your customer only to answer routine inquiries such as ” What security measures do you have in place?” or “What are your…

How to Start a Self-Storage Business? A Beginner’s Guide!
Have you ever thought about starting your own business?

Top 5 Tips for Data Driving Your Self-Storage Success
There cannot be two opinions about the value data analysis can bring to a business.

Key Elements of Excellent Customer Service for Businesses
No matter how good our product, how outstanding the service, and how efficient the automation is, at the end of the day, the success or failure of a…

Optimising Self-Storage Operations Through Data Analysis
The self-storage industry is evolving rapidly, with the market projected to grow from $58 billion in 2024 to $72 billion by 2030.

24/7 Self-Storage Solutions: The Role of AI and Chat Commerce
Our latest whitepaper, “24/7 Self-Storage Solutions: The Role of AI and Chat Commerce,” is a must-read for self-storage industry professionals looking to…

How Data Can Make Your Self-Storage Run Like A Swiss Watch
It is common knowledge that data analysis can significantly impact the customer experience and the company’s bottom line, such as by creating more…

Maximize Self-Storage Success with Data-Driven KPIs Insights
Every business measures success by comparing target and actual KPIs. Data analysis can provide valuable insight into the performance of a self-storage…

The Magic of Personalized Products Recommendations
Some days, it feels like we have stepped onto the pages of a sci-fi novel. Improvement in AI technology is progressing at such a pace that it can be…

Transform Customer Experience with AI Chat Commerce
AI is a pioneering technology that lets self-storage operator redefine how they run their business.
Future Unveiled by an AI-Powered Payment Revolution
Chatcommerce and data analysis are not the only areas where AI is changing things up for self-storage.

The Potential of Self-Storage in Europe: An Interview
Self-Storage in Europe

Integrate CRM and PMS for Efficient Self-Storage Management
By integrating CRM( Zendesk, a customer relationship management tool), and PMS(Storeganise, a dedicated property management tool for self-storage), you…

How Customer Experience Drives Business Growth: 2023 Guide
Have you ever stopped to think about how customer experience drives business growth?

Interview with CEO of Self Storage Association of Australia
The SSAA has proudly supported the self-storage industry of Australia and New Zealand for more than 30 years now.

What Is a Digital Transformation Strategy? A Complete Guide!
Have you heard the term "digital transformation strategy" thrown around at work recently and wondered what it means?

Role of technology in self-storage – interview with Andrew
The organization started with the initial drive of Jon Perrins, the founder of Steel Storage, now part of Janus International.

TOP 3 Benefits of Automation in the Self-Storage Business
Automation in the self-storage business leads to increased operational efficiency, which translates into significant cost savings and a higher ROI.

Zendesk: Enhancing New Hire Onboarding and Employee Experience management(EX)
Have you checked 5 signs that your company’s HR system may need an overhaul? If not please read it too!

The Rise of Cloud Cameras: Insights from our Interview with Safie
Our company was established in 2014 by three former Sony Corporation employees. Under the leadership of our President and CEO, Mr.

Why staffing agencies need centralized communication
The younger generation is tech-savvy and has grown up using digital communication channels.

Voice from the Self-Storage Industry: Access control in self-storage 1
Sebastian: I am the CEO of Karibu. We are a Vienna based IT consultancy. We help real-estate companies with their technology needs.
Voice from the Self-Storage Industry: Access control in self-storage 2
Sebastian: Adding access control to your self-storage isn’t cheap. It used to be maybe 300 euros per door.

Annie Chang Considers the Impact of the Pandemic and Work
I recently caught up with my good friend Annie Chang, of AC Global Solutions and Founder of Women in Technology Japan (WITJ).

IoT trends for self-storage: discussion with industry visionaries X1 Studio
We founded X1Studio because we realized that new technology is evolving at an increasingly faster pace.

The future of smart access control in self-storage – Interview with Stefan Scheuerle, CEO of Sensorberg
Sensorberg was founded in 2013. It started out as a beacon company, but soon the team realized that IoT was the way to go.

A Look at Past Data and Current Trends of the Japanese Self-Storage Market
The domestic self-storage supply has continued to grow consistently 8-10% relative year over year through to 2020, although the buildup and nature of that…

Interview with Lisa Gerosa : Resort Manager at OBLU by Atmosphere at Sangeli, Maldives
Customer experience is crucial because we can hugely impact peoples’ lives, even though we sometimes don’t recognize it.
Interview with Joshua Webb, CEO and Co-founder of Calcumate
Calcumate is a 3D storage calculator and size guide for self-storage and moving companies.

Choosing The Right Solution to Manage Storage Operation
With the rise of holistic self-storage management software, running a facility effectively and efficiently has arguably never been easier.

Interview with Robert A. Chiti, founder and CEO of OpenTech Alliance
My name is Robert Chiti. I am the founder of OpenTech Alliance. I’ve worked for large global software companies and accounting firms in the technology…

Agile Project Management
Agile Project Management is a project management methodology primarily used in IT projects and many other projects.

IT Project Rescue
Our consultants will apply our vetted and tested evaluation methods to analyze what went wrong.

Real-time reporting
All Zendesk Explore dashboards are live and refreshed daily or hourly, based on your subscription type.

Do better Scrum
The Agile Manifesto - A set of values and principles:

How Zendesk Implementation Helps Arealink Maintains Industry Leadership and High Customer Satisfaction
Arealink, established in 1995, is primarily engaged in acquiring office buildings and converting them into rental space, mostly “trunk room” spaces for…

Rethinking HR tech for Employee Experience Management : How Unwired Logic helped FIP group improve communication and collaboration with Zendesk and SweetHawk
FIP Group is an Australia-based recruitment specialist and workforce solutions provider from PeopleIN group.

From Burnout to Bliss: 2 SweetHawk Applications +Zendesk for Improving Employee Happiness
High workloads and repetitive tasks are the leading causes of stress and burnout in the workplace.

Digitize the Customer Experience by Social Networking Integration
Sending a message through Facebook or LINE is so much more convenient. The expectations are equally high – excellent experience and quick replies.

Sunshine Conversations
In the 1830s, the invention of the telegraph transformed communications. In 1858, when the transatlantic telegraph cable was completed, it became possible…

Answer bot
Answer Bot is your first line of defense to deflect repetitive and common questions. Users report a 10% increase in self-service resolution rates.

Zendesk Suite
With Zendesk Suite your team can to deliver personalized customer support across all of your business channels like email, voice, chat, and more.

Zendesk Talk
Zendesk Talk is specialized call center software that allows you to make and receive calls in your browser.

Zendesk Support Helps the Wheels Turn Faster at Cyclism
Cyclism, founded by passionate cyclist Danny Robinson, sells cycling gear and accessories to cycling enthusiasts in Japan.

Better Energy Management in Self-Storage
We’ll elevate your customer acquisition and retention strategy. Whether you offer traditional or digital support, one flexible platform..

A Retailer’s Guide to Getting Omnichannel Customer Service Right
Knowing this type of support is required by customers and delivering on it are two entirely diferent things.

Why staffing agency needs the latest HR tech
Staffing agencies need to be able to onboard workers quickly and efficiently to meet the demands of their clients.

How Storeganise streamlined Oshiire Sangyo’s self-storage system with the power of automation
Knowing this type of support is required by customers and delivering on it are two entirely diferent things.

Let’s talk about prices – Interview with Ahmet Kuyumcu
We’ll elevate your customer acquisition and retention strategy. Whether you offer traditional or digital support, one flexible platform..

Whatsapp meets Self-storage
We’ll elevate your customer acquisition and retention strategy. Whether you offer traditional or digital support, one flexible platform..

Create a powerful connection with the younger workforce-particularly those in the millennial and GenZ
Knowing this type of support is required by customers and delivering on it are two entirely diferent things.

4 ways to improve your customer perception and boost your business
The 2021 Zendesk Customer Trends Report found that 1 in 2 customers is willing to switch to the competition after just one bad experience with a business.

High-quality, clean and eco friendly- what comes next in self-storage in Japan? - Interview with Dan Morisaku, Ichigo Inc. and Storage Plus
We’ll elevate your customer acquisition and retention strategy. Whether you offer traditional or digital support, one flexible platform..

Interview with Hideaki Suzuki, senior research director at Cushman Wakefield
Knowing this type of support is required by customers and delivering on it are two entirely diferent things.

5 signs that your company’s HR system may need an overhaul
We’ll elevate your customer acquisition and retention strategy. Whether you offer traditional or digital support, one flexible platform..

Project Management Consulting
Our bilingual consultants have a wealth of experience in a broad range of industries.

Let’s get conversational: 9 ways to transform your CX with messaging
We’ll elevate your customer acquisition and retention strategy. Whether you offer traditional or digital support, one flexible platform..

Stand out from the crowd with your omnichannel customer service
Knowing this type of support is required by customers and delivering on it are two entirely diferent things.

Deep dive into self-storage automation - Interview with Miles Davison, CEO of Storeganise
Knowing this type of support is required by customers and delivering on it are two entirely diferent things.

How Zendesk streamlined Whitestone’s customer support system
“UR” stands for Urban Renaissance and is an abbreviation used for Urban Renaissance Agency properties.

Why Employee Experience(EX) is Important for Your Company
We’ll elevate your customer acquisition and retention strategy. Whether you offer traditional or digital support, one flexible platform..

Unwired Logic and SweetHawk, #1 Zendesk app partner, announced their official partnership.
Knowing this type of support is required by customers and delivering on it are two entirely diferent things.

CX White paper – Is your business CX ready?
We’ll elevate your customer acquisition and retention strategy. Whether you offer traditional or digital support, one flexible platform..
Tell us what's leaking. We'll tell you if we can help.
45 minutes. No deck, no pitch. We ask three things, listen, and tell you straight whether we're the right people for the problem.